
Jan's Working with Presentations
Format: Transitions & Animations:
Animations
An animation effect applies a motion to or changes the appearance of part of a slide , such as a bullet point or an image or part of a chart. A common animation effect makes each bullet point appear only after a click.
Why use animations?
By using animations you can help your audience absorb the information gradually, instead of hitting them with a whole slide's worth of info at once.
When a new slide appears with a lot of info, your audience will sit there reading it all while you are trying to talk about just the first point. They may miss your wonderful words!
Adding a bit of motion or sound when something new appears on the screen helps keep your audience awake and attentive. Too much will annoy them and distract them from your presentation. It's a fine line to walk!
Animation Choices
You have a wide choice of animation effects, including many that are similar to the transition effects. Too many to list here!
There are four aspects of your objects that can be controlled with animations. You can combine these to create complex behaviors. The choices are somewhat different in each version of PowerPoint. Sometimes just the name changes but sometimes effects are just dropped.
Basic Effects in ribbon gallery:
 More Effects: You can open a dialog with more effects using the More button for the Animation gallery.
![]() Not too much: A cute and interesting effect can quickly become highly annoying when used too often!
Not too much: A cute and interesting effect can quickly become highly annoying when used too often!
Animations Ribbon and Pane
PowerPoint 2007 is different from the newer versions in how they let you access animations. The directions in the Step-by-Step portion will show different directions when necessary.
![]() PowerPoint 2007: The Animations ribbon tab contains a gallery of transitions, but no gallery for animations. You must use a Custom Animation button to open an old style Custom Animation pane to add or edit animations. Awkward!
PowerPoint 2007: The Animations ribbon tab contains a gallery of transitions, but no gallery for animations. You must use a Custom Animation button to open an old style Custom Animation pane to add or edit animations. Awkward!
- Add animation effect: Click Custom Animation button to open the pane. Click Add Effect button in pane and pick an effect.
Effect is added to the list in the bottom part of the Custom Animation pane. - Manage effect options: Use the drop menu for the effect in the Custom Animation Pane.
- Change order of effects: Drag effect to new position in the list or use arrows at the bottom of the pane.
![]()
![]()
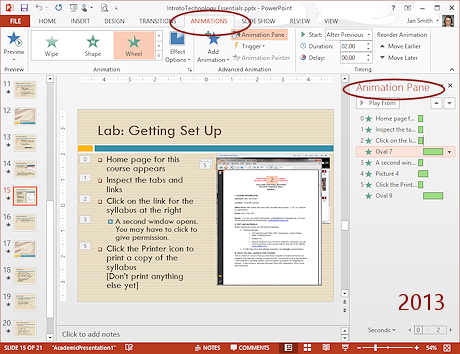
![]() PowerPoint 2010, 2013, 2016: Animations and Transitions each have their own ribbon tab.
PowerPoint 2010, 2013, 2016: Animations and Transitions each have their own ribbon tab.
- Apply animation effect: Select an effect in the Animations gallery on the ribbon.
Effect is added to the list in the Animation pane. You open the pane with the Animation Pane button on the ribbon. The pane does not open automatically. - Manage effect options: Select Effect Options button on the Animations ribbon tab or use the drop menu for the effect in the Animation Pane.
- Change order of effects: Drag effect to new position in the Animation Pane or use arrows to move the selected effect up or down in the order.
![]() Problem: Add Effect button or palette of animations is grayed out.
Problem: Add Effect button or palette of animations is grayed out.
You must first select an object that can accept an animation before the animation commands are available.
Solution: Select something that can take an animation!
Numbered Squares: Once you apply an animation, it is listed in the animation pane and a matching numbered square appears in the Slide Pane next to the slide part that is animated. The numbers show the order in which animations will be run.
Advanced Timeline: The colored bar beside each effect in the animation pane represents the amount of time it will take to run. The colors match the type of effect. Entrance = green, Emphasis = yellow, Exit = red, Motion path = blue. If you do not see this timeline, open a list of options for an effect and click on Show Advanced Timeline.
Configure an Animation
The options for how an animation runs are available in several ways for the most common changes - Animations ribbon, Animation pane, Effect Options dialog. But some options are available only in the Effect Options dialog. You can get complete control, but you have to dig deep for some things!
| Ribbon | |
| Effect Drop List in Animation Pane  | Effect Options dialog  |

Animation Features
Start: You can control when an animation starts.
![]() Pane
Pane 
![]()
![]()
![]() Ribbon
Ribbon 
-
only on click
-
together with previous animation (including the transition)
-
after previous animation has finished
![]() AutoAdvance: For a slide show to run automatically, all animations must run either with or after the previous animation, plus slide transitions must advance on a timer.
AutoAdvance: For a slide show to run automatically, all animations must run either with or after the previous animation, plus slide transitions must advance on a timer.
Property: For most animations you can modify a property, like the direction of the motion, the font style or color, or the degree of rotation.
![]() Pane
Pane 
![]()
![]()
![]() Ribbon button
Ribbon button 
Speed: For most animations you can select a speed/duration. PowerPoint 2010, 2013, and 2016 also let you set a delay before running the animation.
![]() Pane
Pane 
![]()
![]()
![]() Ribbon
Ribbon 
Paragraph animation: Some animation effects allow your bullet lists to appear all at once or one at a time. PowerPoint 2007 has choices on the ribbon. PowerPoint 2010, 2013, and 2016 have these choices in the Effect Options menu. All versions have a Text Animation tab in the Effects Options dialog. The choices will show only for animations that allow such options.
![]() Ribbon
Ribbon 
![]()
![]()
![]() Ribbon button
Ribbon button
Text animation: You can apply most text animations either letter by letter, word by word, or all at once. the Effect Options dialog contains the choices.
| What you will learn: | to apply an animation to modify an animation with Effect Options to remove and restore an animation to apply animations to the Master slide |
Start with: ![]() AnniversaryTripsOffer4-Lastname-Firstname.pptx from the Class disk
AnniversaryTripsOffer4-Lastname-Firstname.pptx from the Class disk
An animation applies to an object on a slide while a transition applies to the slide as a whole. The animations palette is grayed out until you select something on a slide that can be animated. Animations are grouped as Entrance, Emphasis, Exit, and Motion Paths. Some are the same effect as in Transitions, but applied to an object instead of the whole slide.
-
 Open AnniversaryTripsOffer4-Lastname-Firstname.pptx from your Class disk.
(NOT the autorun version you created last in the previous lesson which was saved as AnniversaryTripsOffer4-auto-Lastname-Firstname.pptx.)
 Experiment: Animations
-
 Switch to the Animations ribbon tab.
All animation options are grayed out. You have not yet selected anything that can take an animation.On Slide 1, click on the title placeholder on Slide 1 to select it.
-
Click each of the animations in the gallery.
Suggestion: Use the arrow on the gallery to rotate a new set of icons into view instead of opening the full palette.AutoPreview runs the animation in the Slide Pane.
Can you guess from the icon what the motion or change will be?Some animations happen too fast in preview. Others depend on a color change that does not happen with the white text.
 Problem: No AutoPreview
This choice can be turned off.
Solution: On the Animations ribbon tab, click the Preview button and then on AutoPreview.
Verify that AutoPreview is on by clicking the Preview button again. There should be a check mark beside AutoPreview. -
Close the presentation without saving any of your changes.
(You may not be able to Undo enough times to get rid of all the changes.)
Apply Animation
The animation effect you pick is applied to the parts of the slide that are currently selected. The disadvantage is that you cannot apply the same effect to different slides at the same time. In PowerPoint 2010, 2013, and 2016 you can use the Animation Painter to copy animation effects to other objects. It's about time they added this feature!
-
 Reopen AnniversaryTripsOffer4-Lastname-Firstname.pptx
-
Show Slide #2 in the Slide Pane.
-
Click in the bullet list to select that placeholder.
- Select animation:
 PowerPoint 2007:
 -
 In the Animations ribbon tab, click the button Custom Animation
  .
.
The Custom Animation pane opens at the right of the Slide Pane. -
In the new pane, click the button Add Effects.
A list of categories appears. -
Hover over Entrance to expand its list.
-
Click on Fly In.
A new item appears in the white area of the pane. Problem: Fly In is not in the list
Other effects have been used, pushing Fly In off the list.
Solution: Click on More Effects... at the bottom of the list and look through the expanded list to find Fly In. -
 Click the arrow to the right of the Direction box to open its list.
 -
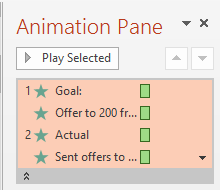
 The Custom Animation task pane now shows a collapsed list of animations that run one after the other.
 The first bullet point and its subpoint in the Slide Pane are both labeled with
 the number 1. This means that they will animate at the same time with the effect that is #1 in the list in the Custom Animation pane.
 All of the objects with the same number run their animations at the same time.
-
 Click the double down chevron
  below the #1 effect in the list to expand the list.
The pane shows when the animation runs:
 Mouse icon = Effect runs when you click on the slide.
No icon = Effect runs with the previous effect
 Clock icon = Effect runs after the previous effect is finished.
 -
Hover over the second item in the list.
A screen tip appears that shows how the effect will appear (On Click, With Previous, or After Previous), gives the name of the effect, and shows the first words in the paragraph (Offer to 200...). This tip does NOT tell you the direction or speed, which should be showing above in the pane.All four paragraphs are using the same effect, Fly In.
-
Click on the second effect to select it.
-
In the top of the Custom Animation pane, change Start to On Click.
-
Repeat for the last animation effect.


 PowerPoint 2010, 2013, 2016:
 -
 On the Animations ribbon tab, click on the Fly In effect in the Animations palette.
The slide changes to show animation numbers. The default is to apply the effect to each paragraph in order, not all at once. The Animation pane does not open automatically.
-
 Click the button Effect Options and choose From Left .
-
 Click the Animation Pane button
  to open that pane.
 The Animation pane now shows a collapsed list of animations. Paragraphs or objects with the same number will animate at the same time.
The default seems to be to require a click to get the next numbered animation to run. Sub-points show up with the main bullet point by default. Not often a good plan!
-
 Click the double down chevron
  to open the list of effects.
The rectangle represents the time the effect will take to play. Changing the duration of an effect will change the width of the rectangle. PowerPoint 2013 and 2016 match the color of the rectangle to the type of animation.
The pane shows when the animation runs:
On Click - Effect is numbered and rectangles line up at left
With Previous - rectangles line up at left without a number
After Previous - rectangles are staggered -
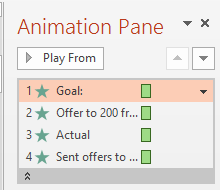
 Click the second item (Offer to 200...) in the list to select it.
 -
On the ribbon, change the Start control to On Click.
The effects are renumbered. -
Repeat for the last animation effect: select and change Start to On Click.
Now all paragraphs will show up only after you click.
-
-
 Click on the first item in the Animation pane and then on the Play or Play From button in the pane to see the effect of your animations in the Slide Pane.
The preview plays without any clicks! Did you expect that?? -
Click on the Slide Show button


 on the Views bar to view the actual show, starting from the current slide.
The slide appears, using its transition.
Click to advance to the next effect. Always check animations in the full Slide Show: The preview of animation effects in the Slide Pane never waits on a click. Always check the Slide Show itself to be sure the effect is behaving the way you intended.
 -
Press the ESC key to stop the Slide Show after the slide has finished.
You are returned to the editing window. - Save As AnniversaryTripsOffers5-Lastname-Firstname.pptx to your Class disk in the powerpoint project2 folder.
Modify Animation: Effects Options
The Effects Options dialog offers even more control over an animation effect than the Animation Pane.
-
 Click animation #3 (Actual) in the list in the Animation pane to show its down arrow. Click the arrow to open the menu.
Alternate method 1: Right click the item in the list.
Alternate method 2: Click the dialog launcher arrow for the Animations tab group in the ribbon. -
From the menu select Effect Options...
A dialog appears with tabs. What tabs and choices you see will vary, depending on what animation has been applied.
-
 On the Effect tab, change the item Animate text to By letter and click on OK.
Look quick! The Slide Pane runs a preview of the changed animation.
 Evaluate: Do you like this effect?
Is it helpful? Interesting? Annoying? - Save.
[AnniversaryTripsOffer5-Lastname-Firstname.pptx] - Experiment: Edit Effects
- Try out some of the options in the Effects Options dialog.
- Change the direction of the Fly In effect.
Is there a direction that makes the 'By letter' option work better? - Apply a different effect.
Are the options different? Try out the options. - When you are finished experimenting, Undo your changes or close the presentation without saving changes and open it up again. No worries about the Undo list with this method!
Remove and Restore Animation
Let's suppose that you decide you don't like the changed animation. You can dump the whole thing with the Remove command, but you may lose more than you expected.
-
Select the second animation in the list.
-
Press the DELETE key.
The item is gone. -
Click on the Play button to see how the animations are working now.
Hmmm. That looks weird. The line "Offer to 200..." shows up with the slide and then the other paragraphs show up. That's not quite what we need. Maybe Undo can save the day.
-
 Click on the arrow at the right of the Undo button

 on the Quick Access Toolbar to open the list of actions. If you did not close and reopen the presentation, you may see quite a number of Custom Animation items in this list. Unfortunately the list does not tell you which custom animation.
 -
Click on the first Custom Animation at the top.
This returns the animation that you deleted.
-
Click Undo again.
This should/might get you back to before the change of the third Fly-In effect to By Letter.
-
Check the change: Click the Play button to preview the slide's animations.
If you went back too far, click the Redo button.
If you have not gone back far enough, click the Undo button again.
Play the slide animations again. Keep trying until you get the correct effect. (If you get entirely too frustrated, you can always re-create the animation!)
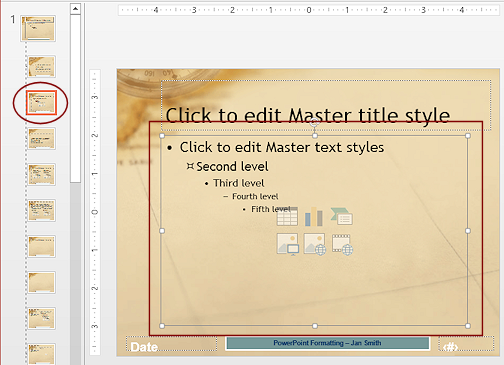
Apply Animation to Master
Now that you have picked and configured a animation, you should use the same animation on similar slides. In PowerPoint 2007 there is no way to copy and paste this formatting of animations. Starting with PowerPoint 2010, Animation Painter will copy all of an object's animations to another object. But you still have to apply the animation to each slide separately!
An alternate plan - If you are going to use the animation on all slides or all of a certain layout, you can apply your animation to the Slide Master or to that layout.
Disadvantage - The Animation Pane does not let you edit or remove any animations applied to a master layout. You have to edit those in Slide Master view. Also, you would have to use a different layout if you had certain slides that you did NOT want to use the animation sequence.
-
Open the Slide Master View.
-
Select the third slide, the Title and Content layout.
-
Select the bullet text placeholder in the Slide Pane.
-
Apply the Fly In effect with -
Start: On Click
Direction: From Right
Speed/Duration: Very Fast/0.5 sec.
-
Play the animation.
All of the bullet levels fly in one after the other. That's what we wanted.
-
Play the whole slide show.
Look carefully at how Slide #2 plays. The custom animation you applied to the first placeholder runs in addition to the animation from the Master. Odd effect!Continue through all of the slides.
-
Return to Normal view.
-
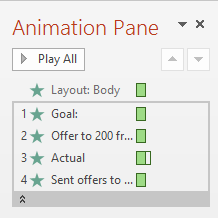 Select Slide #2 again and look at the list of animations.
In the Animation Pane at the top is a new entry- Layout: Body. This tells you that animation was added to this layout. If animation is added to the Slide Master, this line would read Master:Body.You no longer need the animation you applied earlier.
-
Remove each of the animations in the list below Layout: Body.
Hint: If you collapse the list, you can delete all at once.You cannot delete animations applied by the Slide Master from here. That is why the effect name is in gray.If you want to do something different on a particular slide, you could:-
Apply a different layout to the slide and add animations to the layout or to the slide directly.
OR
-
 Open the menu for the effect and choose Copy Effects to Slide. That makes the current effects Custom Animations that you can now edit. These changes apply to just this slide, not to the original layout! Cool feature!!
-
-
Play the Slide Show again. All should work as planned now. If not, go back and fix any errors.
- Save.
[AnniversaryTripsOffers5-Lastname-Firstname.pptx]
Source: https://www.jegsworks.com/lessons/presentations-2/format/step-animations.htm
Posted by: devorahbuxtonis6938.blogspot.com